Crafting a Stylish Backyard Oasis: Comprehensive Plans for Exquisite Wooden Outdoor Furniture
The allure of a meticulously designed backyard, a sanctuary of relaxation and entertainment, is undeniable. Central to achieving this idyllic setting is the selection and placement of outdoor furniture. While commercially available options abound, the enduring charm and bespoke nature of handcrafted wooden furniture offer a unique opportunity to personalize your outdoor space, reflecting your individual style and aesthetic preferences. This comprehensive guide provides detailed plans and considerations for creating stylish and durable wooden outdoor furniture, transforming your backyard into a true haven.

I. Selecting the Right Wood: Durability and Aesthetics
The foundation of any successful outdoor furniture project lies in the choice of wood. Not all woods are created equal when it comes to weathering the elements. Careful consideration must be given to factors such as durability, resistance to rot and insect infestation, and aesthetic appeal.
A. Hardwoods for Superior Longevity:
Hardwoods, characterized by their dense cellular structure, offer superior resistance to decay, insect damage, and general wear and tear. Popular choices for outdoor furniture include:
- Teak: Renowned for its exceptional durability, natural oil content providing water resistance, and rich golden-brown hue, teak is a premium choice, though it comes at a higher price point.
- Cedar: Naturally resistant to rot and insect infestation, cedar offers a beautiful reddish hue and a pleasant aroma. It is a more affordable alternative to teak, making it a popular choice for larger projects.
- Ipe (Brazilian Walnut): An extremely hard and dense wood, Ipe boasts exceptional durability and resistance to the elements. Its rich, dark brown color adds a touch of sophistication.
- Redwood: Known for its natural resistance to rot and decay, redwood's reddish-brown color adds warmth and beauty to any outdoor setting. It requires less maintenance than some other hardwoods.
B. Softwoods: Cost-Effective Alternatives:
While not as durable as hardwoods, softwoods can be a cost-effective option, particularly for smaller projects or those requiring a lighter aesthetic. However, they necessitate greater protection against the elements through treatments like preservatives and sealants.
- Pine: Readily available and relatively inexpensive, pine is a versatile softwood. However, it requires regular maintenance to prevent rot and insect damage.
- Fir: Similar to pine in terms of cost and maintenance requirements, fir offers a slightly more refined grain pattern.
C. Treatment and Preservation:
Regardless of the wood selected, proper treatment and preservation are crucial for extending the lifespan of your outdoor furniture. This includes:
- Pressure-treating: A process that forces preservatives deep into the wood, enhancing its resistance to rot and insect infestation.
- Sealing and Finishing: Applying a high-quality sealant or finish protects the wood from moisture, UV damage, and weathering. Options include oil-based finishes, water-based sealants, and marine-grade varnishes.
II. Detailed Plans for Key Pieces:
This section outlines plans for constructing three essential pieces of outdoor wooden furniture: a comfortable bench, a sturdy table, and relaxing Adirondack chairs.
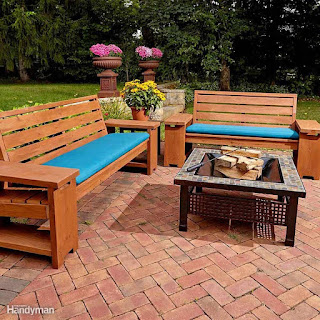
A. The Classic Garden Bench:
A garden bench provides a tranquil spot for relaxation and contemplation. The design should incorporate strong, durable legs, a comfortable seat, and potentially a backrest for added support. Detailed plans would involve:
- Materials List: Specifying the type and quantity of lumber needed (e.g., 4x4s for legs, 2x4s for framing, 1x6s for seating).
- Cut List: Precise measurements for each piece of lumber, ensuring accurate assembly.
- Assembly Instructions: Step-by-step instructions, accompanied by diagrams, outlining the process of joining the components using appropriate joinery techniques (e.g., mortise and tenon, dowel joints).
- Finishing Recommendations: Guidance on applying protective sealants and finishes to enhance durability and weather resistance.
B. A Robust Outdoor Table:
An outdoor table serves as a central point for gatherings and meals. Design considerations include a stable base, a spacious tabletop, and sufficient clearance for comfortable seating. The plan should include:
- Design Variations: Options for different table shapes (e.g., square, rectangular, round), sizes, and styles.
- Construction Techniques: Detailed explanation of how to create a strong and stable table base (e.g., using four legs, a pedestal base, or a trestle design).
- Tabletop Construction: Methods for creating a durable and aesthetically pleasing tabletop (e.g., using planks, a single slab, or a mosaic design).
- Hardware Specifications: Information on the type and size of screws, bolts, and other hardware needed for assembly.
C. Relaxing Adirondack Chairs:
Adirondack chairs epitomize relaxed outdoor living. Their iconic design combines comfort and style. The plan would focus on:
- Detailed Diagrams: Clear and precise diagrams showcasing the angles and dimensions of each chair component.
- Joinery Techniques: Explanation of the appropriate joinery methods for creating strong and durable joints (e.g., using screws, bolts, or wood glue).
- Comfort Considerations: Discussion of ergonomic principles to ensure comfortable seating and proper back support.
- Customization Options: Ideas for personalizing the chairs through the addition of armrests, footrests, or decorative elements.
III. Safety and Environmental Considerations
Constructing wooden outdoor furniture involves the use of tools and materials that require careful handling. Safety precautions must be observed throughout the process. Furthermore, responsible sourcing of wood and environmentally conscious disposal of waste materials are essential.
- Tool Safety: Always use appropriate safety gear, including eye protection, gloves, and dust masks.
- Wood Selection: Choose sustainably sourced wood whenever possible, supporting responsible forestry practices.
- Waste Disposal: Properly dispose of sawdust and other wood waste, avoiding environmental contamination.
- Finish Selection: Opt for low-VOC (volatile organic compound) finishes to minimize air pollution.
By following these comprehensive plans and adhering to safety guidelines, you can create beautiful, durable, and stylish wooden outdoor furniture that will enhance your backyard for years to come. The satisfaction of crafting your own personalized outdoor space is immeasurable, transforming your backyard into a true reflection of your individual taste and style.


